Showing posts with label toilet paper roll craft. Show all posts

2.5.20

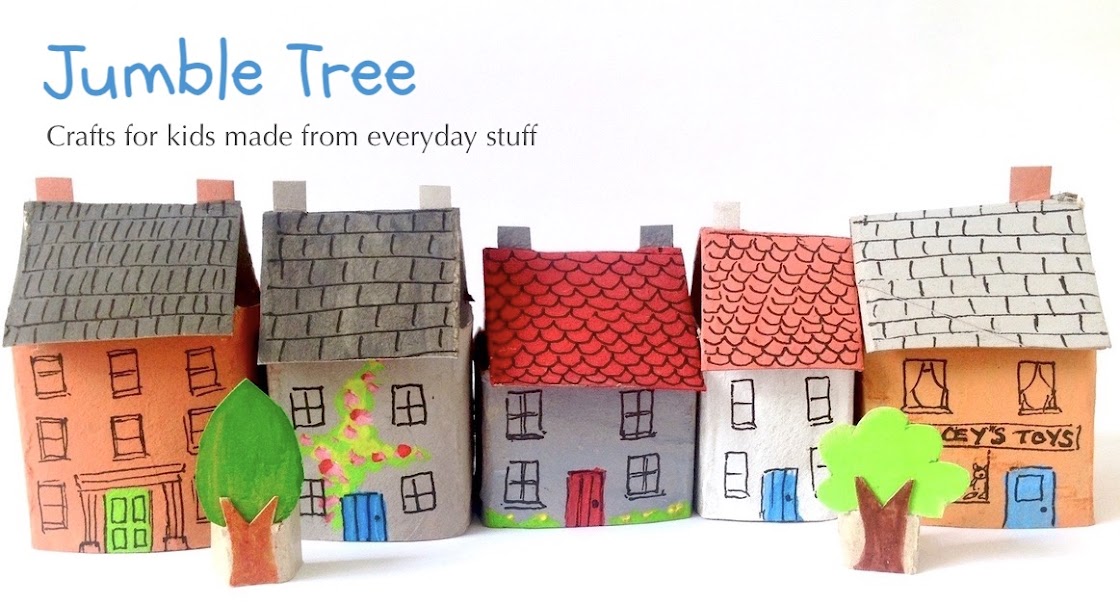
Paper roll birdhouse for little egg carton birds


toilet paper roll craft


There have been so many of these sweet little egg carton birds popping up here over the years, and I thought it was about time they had a home! The birdhouse is made from one toilet paper roll (or part of a kitchen roll) and really doesn't take long to do.

You will need:
Toilet paper roll
Scissors
Craft glue
Paper clips or similar (laundry pegs work too!)
Paint or pens to decorate
Egg carton (for the bird)
Black pen

1. If you want to paint your birdhouse, do that first, and when the paint's dry, flatten the tube with your hand, pressing firmly along the two creases.

If you're keen to decorate your bird house with felt-tips or marker pens, it's best to do that now, when the tube is flat. That's how we did the flowery and the striped one above. (I used a thick marker pen for the stripes)


2. Draw a pencil line across the tube that's below the halfway mark. Our tube was roughly 10cm high, so we drew the line across about 4cm from the bottom edge.


3. Line up the two creases in the middle, and press down on the tube again on a flat surface. Press firmly along the sides, to make another two creases.

You've now made four evenly spaced corners and turned the circular tube into a square shape, but keep it flat for now.


4. Continue the pencil line across the tube.


5. Squeeze into shape, and cut down all four corner creases to the pencil line on the longer part of the tube. (see pic below)


6. Bend one of the flaps forward, folding it firmly on the pencil line.


7. You then need to fold it back on itself, leaving a little shelf or ledge jutting out. Press firmly along this crease too.

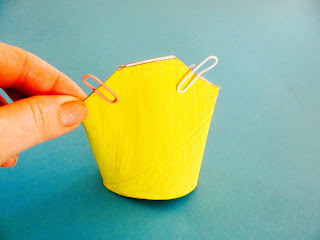
8. Pull the flap back, brush a little glue in the crease and press into place again. Use something like paper clips or a laundry peg to hold it while the glue dries.


9. Now fold the flaps either side. You need to fold them out, so they're just below the little shelf you've just made. (see pic below). And even. Press firmly along the creases.


10. To make the roof of the birdhouse, bend these two side pieces inwards now, pressing the ceases the other way. So you're bringing the two flaps towards each other.

Brush some glue along the very top edge of one side (don't use too much glue or brush it too far down the card).

Use paper clips or something similar to hold the top of the roof together while it dries.


11. When it's dry, take the clip off and press the top of the roof down with your finger, to get it back into shape.


13. Cut the card away at the back, roughly following the contours of the roof.


14. I've already written a few tutorials for the little birds, but here's a quick reminder.

Roughly cut out an egg carton cone from the carton, and cut around the cone, just above the bumpy cardboard joins.

To make this easier you could draw a rough line around the cone, just above the cardboard join. Cut up to the line at an angle, then cut along the line.


15. Once your cone is cut out, draw a pencil line around the cone, about halfway up. Don't worry if the line is a bit wobbly, it's just a guide.


16. Cut up the four corners to the pencil line, and bend three of the flaps out, folding on the line. Cut these three flaps off.


17. The remaining one is the tail feathers. Shorten this if you want.


18. You can either cut out wings (teardrop shape) from the little bits of left over card, or simply draw on wings with a black pen after you've painted your bird.


19. Set your bird on top of a spare cone, this makes the painting a lot easier.


20. Dot on eyes with a black pen near the very top of your bird's head. Paint or draw on a beak just below the eyes. Or cut out a little orange/yellow triangle and glue it on with a glue stick.
28.3.18

Brian the Lion


What can I say about Brian? He was the first cardboard tube animal I made with my daughter, and I've always had a soft spot for him.  He really kicked off the whole Zoo and Farm craft journey, so I couldn't be happier he now has his very own picture book.

'Brian the Lion goes into Space' is a colourful, wacky space adventure, with some fun twists and turns along the way.. There are lots of little beardy blue gnomes, rainbow food, oh, and a friendly dragon called Norris.. 


Brian the Lion goes into Space
The gnomes want to read Brian's new book!

The book combines storytelling and craft, as Brian's world is made out of cardboard (of course).. 
All the picture scenes in the book are created from ordinary packaging like egg cartons, tubes and cereal boxes. Plenty of familiar things for kids to spot, and hopefully it'll inspire some making too! The book is available on Amazon.

I have shared a Brian project before, quite a long time ago now.. so, in honour of his first book, I've updated it here.

You will need:
Toilet paper tube (or kitchen paper roll)
Cereal box card
A cup/beaker and egg cup/spice jar or similar, to draw around
Craft glue
Scissors
Ruler
Pencil
Yellow and Brown paint (mix a little red with yellow and a dab of blue)
Black felt-tip or gel pen
Paper clips

1. Paint the tube and some cereal box card yellow (enough for the face, tail and paws) and paint another piece of card brown (enough for the mane). 

Painting first can speed up the making (if your mini maker doesn't mind a short wait at the start..), but in MYOZ we got stuck in straight away, cutting and gluing the body first, and then painting, which is fine too!


2. When the paint is dry, cut the tube so it's about 8cm high. An easy way to do this is to use a ruler to  mark 8cm on the side, then squeeze the tube flat, near the mark, and cut across, cutting through the mark (younger ones might need some help cutting through the double card).


3. Squeeze the top part of your tube together again, and give Brian some shoulders by snipping little triangles off the sides. Don't take too much off.


4. Brush some glue all along the inside edges of the end you've just cut. Don't overload with glue or it will ooze out everywhere when you squeeze the glued sides together.


Use two paper clips to keep the sides together while the glue dries.


5. Time to make Brian's head. On the brown card, use a pencil to draw around a big circle, like the top of a cup or beaker - and draw around a small circle, like an egg cup or spice jar on the yellow card. Carefully cut these out. (slowly turn the card circle towards you as you cut, rather than moving or turning the scissors.)


6. Place the smaller yellow circle in the middle of the brown one, and when you're happy, lightly draw around it and put aside.


(*see tip below for younger makers) 

7. For his mane, the best and easiest way to keep it even, is to cut up to the pencil line and then make a cut opposite the one you've just made.
Halfway between them, make another cut on both sides. 


Keep cutting halfway between all your cuts until you feel his mane is full enough. (Don't worry if you cut over the pencil line, this will be covered up by the face in a moment)


8. Draw on Brian's face with a black pen. Brush a thin layer of glue on the back of the face and place it in the pencil circle on the mane. Make sure you don't use too much glue or it will squidge out the sides!


9. From the spare yellow card, cut a thin strip for a tail and cut out two paws. (You could make a paw template first, then draw around it to keep your paws the same size). 

We cut out a little brown piece to glue onto the end of the tail too, but leave it plain if you want, or colour in the end with a pen. Add some claws to the paws.

10. Glue the paws on, again, just use a little glue, and make sure they don't hang over the edge of the tube. Dab some glue on the plain end of the tail strip (painted side) and stick it at the back, inside the tube (you can bend it into place when the glue has dried).

Finally, remove the paper clips and glue on the head.


Leave Brian lying on his back while the glue dries. 


 When Brian's ready, bend the tail back, into place, and fluff up his mighty mane!


* TIP: For younger makers, leave out the mane cutting and draw on paws instead of cutting them out.

There's also a tutorial to make the little blue gnomes Brian meets on his adventure in space. Using corks and cotton wool! Full step-by-step instructions here.


8.5.16

Hay workshops and a hungry giraffe...


I got a bit carried away and promised someone I'd make a giant giraffe out of loo rolls...
It seemed like such a good idea at the time.

Now of course I am sort of regretting it, as I'm not totally sure what I'm doing. Really hadn't thought it through. But that's what happens when you get caught up in a wave excitement - and I was - I was proper surfing that wave, because the toddler-sized giraffe is for the Hay Festival. THE Hay Festival!

I love the Hay Festival, and this year I'm going to be there, not just visiting, but actually doing Make Your Own Zoo workshops, like the one I did before Christmas. Such an amazing opportunity.

We're lucky enough to live fairly close to Hay, so the 2 week Literary Festival has always been an easy option for us, and it's a great way to spend a day. Such a relaxed event; just wander in - you only need tickets for the talks, which you can book in advance online, or on the day, if there are any spaces left. Always such an interesting, diverse range of writers - serious, funny, thought-provoking, informative, quirky, illuminating - a long list and a packed programme. Don't really want to say there's something for everyone; such a cliche, but there probably is. The rest of the time you can amble around the stalls, check out the food hall, do a spot of people/celeb watching and then maybe enjoy a glass of something lovely as you sit in the sun (hopefully) reading a book you've just bought. Or snoozing.

Obviously this would be a perfect... if you managed to go without kids. If that's not possible, during Half Term week they lay on loads of activities - talks by well known kids' authors and all kinds of workshops, like the one I'm doing.

I'm going to be in the Make and Take tent on the 2nd June, and there'll be 4 free sessions throughout the day. My plan is a different animal per session, so now I have to work out which ones and how much prep to do, based on what I learnt from the workshops last year. Need to keep things moving along - definitely learnt that.

But I can't properly think about the workshops until I finish the giant giraffe, which is by no means a quick make...

I've used pieces of cereal box card and newspaper to slot tubes together - it is surprisingly sturdy.


Different sized tubes helped a lot with the head.


I've still not completely sure about the body, or how it's all going to come together, and I keep running out of tubes! I've been on the scrounge for weeks, but it is a bit awkward to keep asking, and this giraffe is just gobbling them up.


I'll let you know how it goes!